Author Topic: Too many battery connections  (Read 6336 times)

0 Members and 1 Guest are viewing this topic.

Offline greywolf

  • Member
  • ***
  • Joined: Dec 2011
  • Posts: 5262
  • Location: Evanston IL USA
Re: Too many battery connections
« Reply #20 on: November 29, 2013, 14:52:01 »
The tray under the seat is just one place the fuse block can be placed. On my Wee, adding electrical accessories wound up with most of them at the front, so I moved the fuse block to the front when I replaced the 6 connection Blue Seas fuse block with a physically smaller Eastern Beaver PC8.


On the Glee that had little front end electrical additions, the best and maybe only place for the Rostra electronic cruise control servo required displacing the tool kit and left room for the PC8 in back.  Positive and negative buses on the battery also added connectivity.

Pat- 2007 DL650A was ridden to all 48 contiguous states. 2012 DL650A outlasted me.
Nicknames I use to lessen typing, Vee = 2002-2012 (K2-L2) DL1000s. Veek=2014+ (L4+) DL1000s. Wee = 2004-2011 (K4-L1) DL650s. Glee = 2012+ (L2+) DL650s

Offline jabmotorsport

  • Member
  • ***
  • Joined: Feb 2012
  • Posts: 1869
  • Four Time Quad Bike Champion
  • Location: Hinckley, Leicestershire
Re: Too many battery connections
« Reply #21 on: November 29, 2013, 18:06:31 »
Wow!!

Thanks very much for the help, this is now deffinatley on my to do list, really clarified in my mind what I need to do.

Without being too thick, can anyone recommend a relay for this??

Once again many thanks
Josh
tinker, tweek, fettle....bodge, bang, bugger!!!

Offline frez

  • Member
  • ***
  • Joined: Jun 2011
  • Posts: 2316
Now on a Super Tenere having put 64k miles on a 2011 DL650

Offline MartinW

  • Administrator
  • Member
  • *****
  • Joined: Jan 2012
  • Posts: 12915
  • Bike: DL650 K4 Blue
  • Location: Swindon
Re: Too many battery connections
« Reply #23 on: January 26, 2014, 17:28:10 »
Finally finished wiring the Aux Fuse Box in. The one I purchased is quite big, which meant it took me a bit longer to do. However, it also means it has been future-proofed.

I had to do something as my battery had too many separate wires on it, and I couldn't get the screws to go through into the threaded section of the terminal. This is the horrific scene I had before the fuse box went in. It didn't just need the electrics tidying up, it needed all the muck removing as well.


I really needed to fix the relay to something too as the sticky pad it came with is past its use by date.

I ended up buying this fuse box as I liked the idea of two separate positive rails. One for a straight to the battery connection and one for a switched live for when the ignition is on. The problem is, it's quite big!


This is where the problems started. Although it fitted in the tray under the seat, there was not really any room for the cables to go in and out. I started to drill some holes through for the cables, but that really didn't work, expecially with the thicker cables coming direct from the battery. I ended up cutting down the sides of the tray until they were the same height as the connectors on the fuse box. It wasn't hard to do, just using a stanley knife, but it didn't feel right doing it. However, once done it's a good fit.


Relay bolted down properly too.

Next, how to wire it. Now I am not too confident on mechanics, but not worried by electrics. So this is how I designed and connected the electrons.


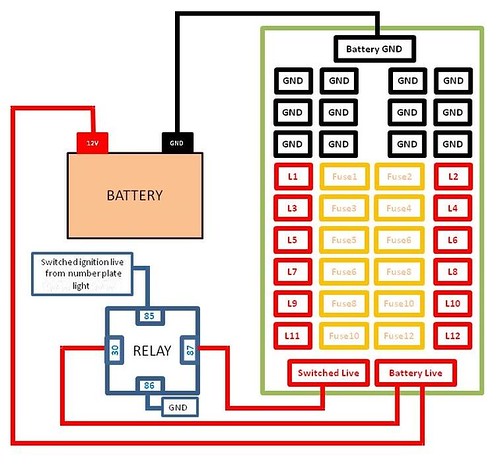
With this configuration, the odd numbered connections (L1, L3, L5, L7, L9 and L11) all work when the ignition is on and the even numbered connections (L2, L4, L6, L8, L10 and L12) are all live all the time.

So wired up and lid on, with fuses fitted.
    L1 = Heated Grips
    L5 = Sat Nav
    L2 = Optimiser
    L10 = Alarm


The alarm has been disabled at the moment by not putting a fuse in FUSE10, but the fuse can be put in again if needed and the alarm's back on.

The other spaces will be used for a 12V socket and a PD Oiler, which are still to fit.

Now the battery only has the two wires that run the rest of the bike and the two wires to the Fuse Box.
Tall, Dark and Handsome (In 1987) - Just tall now !!

Chief Stasi


Offline tallpaul

  • Member
  • ***
  • Joined: Dec 2013
  • Posts: 10385
  • Tastier than the Barrow-in-Furness bus depot...
  • Bike: 2016 Yamaha XT1200ZE
  • Location: Whitworth, Lancashire
Re: Too many battery connections
« Reply #24 on: January 26, 2014, 17:52:17 »
Asda beans! Quality! Top install. Tidies it up nicely. Result!
Old enough to know better, but still too young to care...

Offline james.t

  • Member
  • ***
  • Joined: Jan 2012
  • Posts: 359
  • Bike: DL250
Re: Too many battery connections
« Reply #25 on: January 26, 2014, 18:19:05 »
nice. just one thing can you put the relay the right way up (OK its me. it annoys me sorry)
but good job and pictures too.
j

Offline greywolf

  • Member
  • ***
  • Joined: Dec 2011
  • Posts: 5262
  • Location: Evanston IL USA
Re: Too many battery connections
« Reply #26 on: April 20, 2014, 20:09:07 »
That little sign under the battery in the diagram can be confusing. One possible relay trigger wire can be the orange/green power wire to the rear brake light switch. If you use the actual brake light wire, the fuse block will only be on when the brakes are on.
Pat- 2007 DL650A was ridden to all 48 contiguous states. 2012 DL650A outlasted me.
Nicknames I use to lessen typing, Vee = 2002-2012 (K2-L2) DL1000s. Veek=2014+ (L4+) DL1000s. Wee = 2004-2011 (K4-L1) DL650s. Glee = 2012+ (L2+) DL650s

Offline MartinW

  • Administrator
  • Member
  • *****
  • Joined: Jan 2012
  • Posts: 12915
  • Bike: DL650 K4 Blue
  • Location: Swindon
Re: Too many battery connections
« Reply #27 on: April 20, 2014, 20:20:41 »
Good Point Greywolf.

To avoid confusion, I have changed the picture to only show the number plate light connection.
Tall, Dark and Handsome (In 1987) - Just tall now !!

Chief Stasi


Hilldweller

  • Guest
Re: Too many battery connections
« Reply #28 on: April 20, 2014, 22:30:31 »
Quote from: "MartinW"
I've got too many battery connections now and it's not easy to get the bolts too tighten on the terminals.

If you want simple, two 6mm terminals and 100mm thick flex and an M6 locknut and bolt and a roll of tape.